Principle of design
The design process of a glaucoma drainage stent must address two main issues: fixation and safety within the eye, and drainage efficiency and stability. For intraocular fixation, it is essential that the drainage stent remains in place without movement, and its external shape should not cause any damage to the eye tissue. In this design, a gradient circular section tubular structure is adopted, as circular shapes have the smallest shape factor among different cross-sectional shapes. The smooth transition of the rounded outer surface significantly reduces tissue irritation and minimizes friction-induced bleeding that may occur due to human activity. And this stepped outer diameter design provides a larger contact area. When the stent is subjected to external force, it will bear the horizontal component of the tissue and the frictional force at the same time, which hinders the movement of the stent and effectively reduces the displacement rate of the stent. Drainage efficiency and stability are also critical considerations. Drainage efficiency refers to the ability of the stent to effectively drain aqueous humor per unit of time. To achieve this, numerical calculations of fluid parameters for low Reynolds number microfluidic flow within the stent are involved. In this study, we evaluate the drainage efficiency of the stent by calculating the outlet flow Q (calculated by Eq. 6). The inlet environment for all stents is consistently the anterior chamber, and a greater outlet flow indicates higher drainage efficiency of the stent. Comparing to a pure cylindrical lumen, the gradually expanded cross-section designed in this study offers enhanced efficiency in aqueous humor drainage while mitigating complications such as aqueous humor reflux and low intraocular pressure. When analyzing the flow characteristics within the stent, we assumed that the extra scleral venous pressure (EVP) in glaucoma patients would be 1000 Pa and the anterior chamber intraocular pressure would be 30 mmHg, which is approximately equal to 4000 Pa. Rate of aqueous humor production is 2–2.5 µl/min [13, 30].
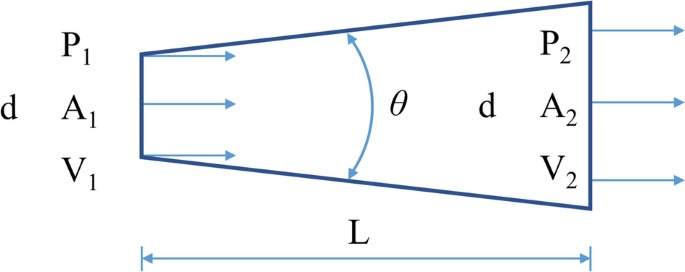
The dimensions of the drainage stent are determined by the principles of fluid mechanics. Figure 7 illustrates the fluid flow inside the tube. According to the principle of energy conservation, the fluid flow in the tube obeys Bernoulli’s principle, which can be expressed as:
$${Z}_{1}+\frac{{P}_{1}}{\rho g}+\frac{{{V}_{1}}^{2}}{2g}={Z}_{2}+\frac{{P}_{2}}{\rho g}+\frac{{{V}_{2}}^{2}}{2g}+{H}_{L},$$
(1)
where P, V, ρ, g and HL are the pressure, velocity of flow, aqueous humor density, acceleration due to gravity and loss of mechanical energy, respectively.
To traverse the anterior chamber and subconjunctival space, drainage stents typically need to have a length of approximately 6 to 8 mm. Due to the low rate of aqueous humor production, the tube’s diameter is typically kept below 100 μm to prevent low intraocular pressure. In the case of such a significant length–diameter ratio, the local resistance of the gradient pipe contributes less to the overall flow resistance, with distance friction becoming the primary factor. The loss of resistance can be described using Darcy’s law:
$${H}_{L}=\xi \frac{{V}^{2}}{2g},$$
(2)
where ξ is the flow damping coefficient. The change in potential energy during horizontal flow can be ignored, and then Eq. 1 can be simplified as follows:
$$\frac{{P}_{1}}{\rho g}+\frac{{{V}_{1}}^{2}}{2g}=\frac{{P}_{2}}{\rho g}+\frac{{{V}_{2}}^{2}}{2g}+\xi \frac{{{V}_{2}}^{2}}{2g}.$$
(3)
It can be seen from the continuity equation:
$${V}_{1}={V}_{2}{\left(\frac{D}{d}\right)}^{2},\Delta P={P}_{1}-{P}_{2}={P}_{1}.$$
(4)
The outlet flow rate can then be derived as:
$${V}_{2}={\left(\frac{2{P}_{1}}{\rho }\right)}^\frac{1}{2}{\left[1+\xi -{\left(\frac{D}{d}\right)}^{4}\right]}^{-\frac{1}{2}}.$$
(5)
At this point, the outlet flow Q can be obtained, and the diffuser flow equation can be written as:
$$Q={V}_{2}{A}_{2}=\frac{\pi {D}^{2}}{4}{\left(\frac{2{P}_{1}}{\rho }\right)}^\frac{1}{2}{\left[1+\xi -{\left(\frac{D}{d}\right)}^{4}\right]}^{-\frac{1}{2}}.$$
(6)
Experimental evidence suggests that in microfluidics, the Reynolds number (Re) is typically small at small scales. When Re falls within the range of 1 < Re < (30–50), the drag coefficient of the diverging pipe can be calculated using the sudden expansion formula [23]:
$$\xi =\Delta P/\frac{\rho {{V}_{1}}^{2}}{2}=\frac{A}{\text{Re}},$$
(7)
where A is a function of diffusion angle and diffusion. When 2α is less than or equal to 40°, A can be expressed as:
$$A=\frac{20{n}_{1}^{0.33}}{{\left(tg\alpha \right)}^{0.75}},$$
(8)
where n1 is the entrance and exit area ratio. From the formulas above, the flow state of the drainage stent can be obtained in the initial implantation state.
Another important consideration in the design of drainage stents is selecting an appropriate inner diameter to ensure adequate flow resistance and prevent low intraocular pressure. The Hagen–Poiseuille equation can be used to calculate the flow resistance of the cylindrical tube, serving as the foundation for the design process:
$$\Delta P=\frac{8\upmu LQ}{\pi {R}^{4}},$$
(9)
where ∆P, μ, L, Q and R are the pressure loss along the lumen, dynamic viscosity, tube length, volume flow and tube radius, respectively.
Flexural strength of the stent
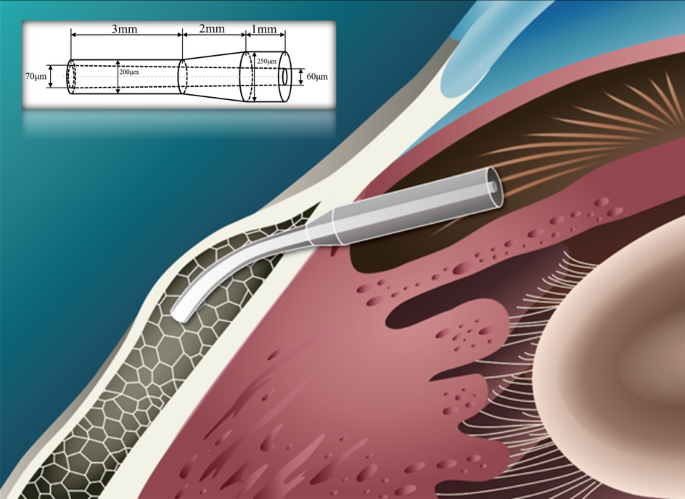
Figure 8 shows the stent implantation. The total length of the stent is 6 mm and the outer diameter is distributed in a stepped pattern: the outer diameter varies along the shaft: 250 μm over 1 mm, reducing to 200 μm over 3 mm, bridged by a 2 mm transitional segment. The stent features a lumen with a cross-sectional expansion: at one end of the outer diameter 250 μm, the inner diameter is 60 μm, and at the other end of the outer diameter 200 μm, the inner diameter is 70 μm. After the micro-drainage stent is implanted into the eye, the caudal end of the stent should be maintained at about 1–2 mm in the subconjunctival space, about 3 mm in the scleral tissue, and about 1 mm in the anterior chamber to prevent the trabecular tissue from blocking the drainage outlet. After implantation, the stent is compressed and deformed by the tissue due to the curvature of the cornea. This concentration of force typically occurs in the middle of the drainage stent [13, 25]. Previous clinical implantation of commercial drainage stents has shown the occurrence of intermediate fractures. Excessive stress concentration is easily identified as the cause of the fractures.
Upon implantation of the drainage stent into the eye, the front half remains straight while protruding into the tissue, whereas the second half bends and deforms in response to the curvature of the sclera, resulting in stress concentration during the middle bending deformation. A finite element analysis of the stent forces was performed utilizing the Solid Mechanics module in COMSOL 5.6. The boundary condition for the flat part of the first half is set as fixed support, assuming no displacement occurs following the implantation of the drainage stent. Furthermore, the second half of the stent experiences a radial force, which is treated as a uniform load due to the small size of the stent. The drainage stent had a material density of 2 kg/m3, a Poisson’s ratio of 0.4, and a Young’s modulus of 204 MPa. We use tensile machines (HY-0350, HENG WING PRECISION INSTRUMENT Co., LTD) to characterize the mechanical parameters of this material. By weighing the mass of a single tensile specimen, then dividing by the volume of the standardized tensile specimen model, we can derive the density parameter of the material. The stress concentration distribution of the diverging drainage stent in this paper and the stress concentration distribution of the commercial glaucoma drainage stent XEN after implantation were analyzed by simulation, and the stress concentration value of the bending part was compared, and the bending resistance of the stent was analyzed.
Materials and fabrication
Previous clinical implantation of commercial drainage stents has shown the occurrence of intermediate fractures [13, 25]. Excessive stress concentration is easily identified as the cause of the fractures. Therefore, the stent must have a certain strength to be able to exist stably in the eye for a long time and avoid being broken. The soft texture can make the stent adapts to the tissue shape, becoming tissue conforming. According to our group’s previous research, the biocompatible materials mixed by SR348OP (ARKEMA Sartomer), Bis-GMA (ARKEMA Sartomer) and PEG600MA (ARKEMA Sartomer) in accordance with the ratio of 7:3:5 were finally selected. This ratio can take into account the strength and flexibility of the stent at the same time. The selection of material ratio comes from the previous research of our group [26].
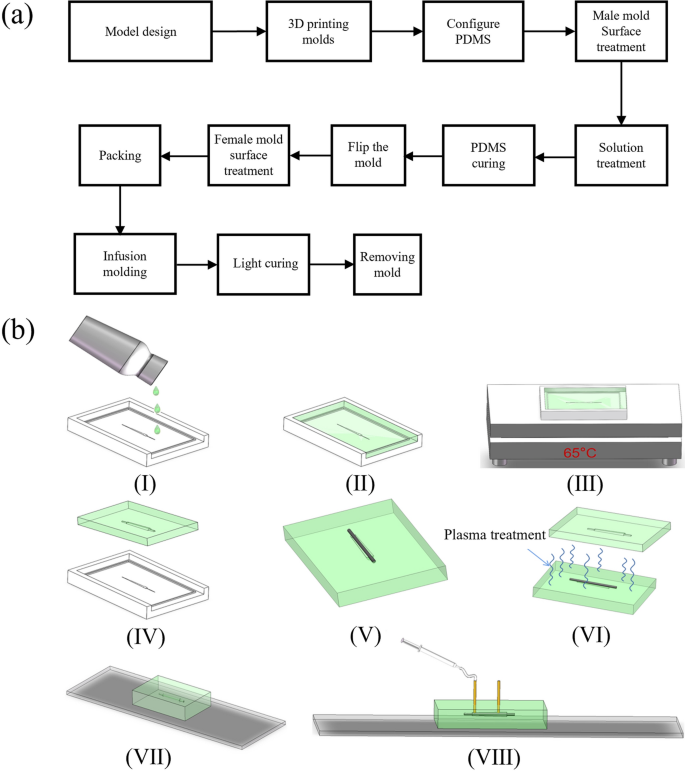
The fabrication process of drainage stents is mainly divided into two stages, namely the microfluidic chip preparation stage and the packaging molding stage. The process flowchart is presented as Fig. 9a.
a Flowchart of drainage stent preparation; b fabrication process of a microfluidic device incorporating a drainage stent. I Pouring PDMS onto a master mold treated with surface modifications. II Filling the mold with a PDMS solution. III Curing the PDMS on a thermostatic heating table at 65 °C. IV Removing the PDMS chip from the mold after curing. V Placing a tungsten steel needle in the guiding groove of the mold. VI Subjecting the chip to plasma treatment with the inserted tungsten steel needle and a matching chip. VII Packaging the chip VIII Injecting stent material into the chip using a syringe pump
First, the mold is designed and printed using a DLP printer. We used light-curing 3D printing technology to print the mold for subsequent mold turning, which is a very common method in the field of microfluidic chip preparation. The DLP 3D printer (Shape 1 +, RAYSHAPE 3D Co., Suzhou, China) we use can have a minimum layer height of 25 μm, and the final mold size is 3 cm*5 cm*0.8 cm. The PDMS solution (Sylgard 184, Dow Corning) and PDMS curing agent (Sylgard 184, Dow Corning) are mixed thoroughly in a ratio of 10:1, and any bubbles generated during the stirring and mixing process are removed using a vacuum pump. The solution is then poured into the mold, and another round of vacuuming is performed to remove any air trapped the surface of the mold the pouring process. Next, the mold is placed on a thermostatic heating table, and the temperature is adjusted to 55–75 °C. The mold is heated for a period of 2–6 h to facilitate the curing of the PDMS. Finally, the PDMS curing chip is carefully removed from the mold and covered with a preservative film to protect it.
The process of chip packaging and infusion molding consists of 8–12 steps, as shown in the flowchart (Fig. 9b). Initially, the mold is placed into a plasma cleaning machine (PDC-MG, CHENGDU MINGHENG S&T CO., LTD) and subjected to oxygen treatment for approximately 10 min (30W, initial vacuum level 1.0E5). This step is to allow the PDMS mold to be bonded (Fig. 10b–f). PDMS has good hydrophobicity after curing, and in order for the liquid to pass through the microchannel smoothly and make the molded stent structure uniform and complete, it must be changed from hydrophobic to hydrophilic. Microfluidic chips fabricated using PDMS can be bonded to a variety of substrate materials through plasma-modified bonding processes, which are widely used in the field of microfluidics. Then, the perfusion port and drain port are carefully chosen before proceeding with the packaging process. At the same time, lumen construction metal (a tungsten steel needle of non-cylindrical outer diameter, which has a certain degree of flexibility and is not easily breakable) is required for coaxial placement. This step is to remove the needle to form a non-cylindrical lumen after the stent has been cured. After placing the tungsten steel needle and bonding the upper and lower halves of the chip, the stent material is injected from the injection port with a needle until the chip cavity is filled. Then, it is cured by exposure to a 365 nm ultraviolet curing lamp for approximately 20 s. Subsequently, the drainage stent is removed from the mold and soaked in alcohol (75%, General reagent). This is to facilitate the subsequent removal of the cured stent from the mold. After a specific duration, the stent is retrieved and the tungsten steel needle is removed. Following that, the samples are soaked in cysteine (Sigma-Aldrich), undergo surface treatment. This is an amino acid that contains sulfhydryl functional groups. The sulfhydryl functional group of the amino acid undergoes an addition reaction with the unreacted acrylic ester double bonds on the drainage stent, preventing residual double bonds from causing cytotoxicity and thus enhancing the surface biocompatibility of the drainage stent. It is then sterilized, sealed, and finally dried for preservation.
Injection setup
The minimally invasive injection implant system plays a crucial role in MIGS devices used for glaucoma treatment. The injection system needs to fulfill several functions, including puncturing, delivering the medicine, and providing support to the implant, to meet the clinical requirements of minimally invasive implantation. For the details required for the exercise of each function, specific design requirements are made, such as the encapsulated shell, one is to support the internal pusher, guide the pusher to propulsion, and also pay attention to the shell to facilitate the surgeon to hold the bolus. The puncture function should pay attention to the diameter of the puncture needle should not be too large. The bolus function needs to pay attention to the smoothness and smoothness of the bolus. Because the inside of the eye is a confined space, air is expelled into the anterior chamber of the eye during the syringe, so the pressure balance also needs to be considered.
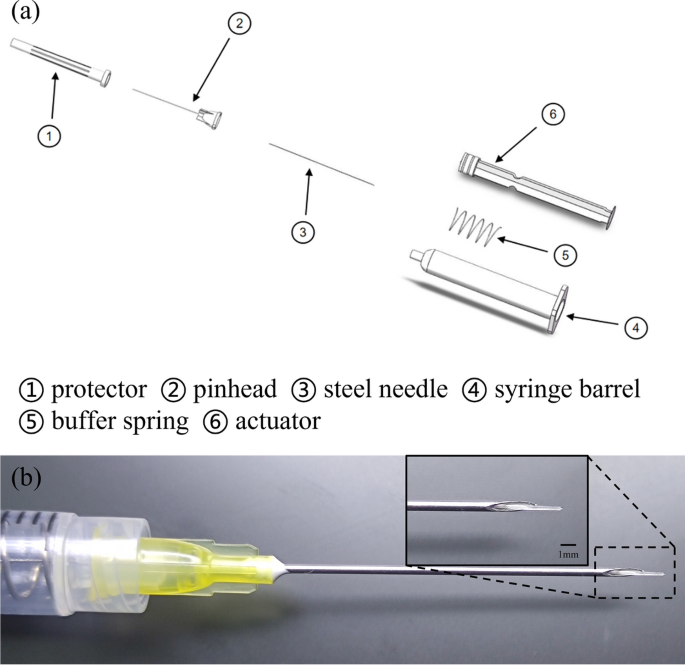
Before assembly, the parts of the injection system are sterilized, the metal parts of the injection system are sterilized at high temperature, and the plastic parts are irradiated. The puncture needle of the injection system should be matched with the outer diameter of the drainage stent. The stent’s maximum outer diameter is 250 μm, for which we opt for 20–22G needles to ensure compatibility. Given that the stent employs a hydrogel material capable of water absorption and swelling, the needle’s inner diameter should slightly exceed the maximum outer diameter of the stent, allowing ample room for swelling. By adding a buffer spring to the syringe barrel, it is convenient for ophthalmologists to perform surgery with stable bolus injection and easy force control. A built-in steel needle is designed at the top of the actuator, and the steel needle fits with the gap between the needles outside the injection implantation system to achieve the stent bolus function. The assembly process of the injection system involves several steps (Fig. 10a). Firstly, the inner steel needle is inserted into the actuator’s holster. Then, a spring is placed on the steel needle. Next, an ordinary needle is used to connect the inner steel needle in the syringe barrel, guiding it out of the syringe. The steel needle is then threaded into the external pinhead, and finally, the pinhead is screwed into the syringe. Once these steps are completed, the injection system is fully assembled. Finally, it should be stored in a light-protected sterile environment. Figure 10b illustrates the fit of the injection system with the stent.
Degradation properties of the stents in vitro
The drainage stent is implanted in the eye for an extended period of time, and besides its drainage function, degradation stability is of paramount importance. Considering the small mass of the individual stent and the accuracy of the instrument, the enlarged samples are made for degradation experiments with the mass of about 1.3 mg per stent. The 10 stents are considered as one parallel sample, for a total of 5 parallel samples. The measurement time is 1, 2, 3, 6, 9, and 12 months from the start date. The specific steps for degradation experiments are as follows: weighing of a parallel sample using a balance, recorded as W0. The specimen holder was subsequently placed in a 5-ml centrifuge tube, followed by the addition of 4 ml of PBS (pH = 7.4) (HyClone). The parallel samples were then placed in a constant temperature shaking box at 37 °C and 80 rpm. The stents were immersed in PBS for 1, 2, 3, 6, 9, and 12 months, respectively. At each measurement time point, the specimen is removed, and the weight of each parallel sample is measured after drying, recorded as Wfd. Each set of data is the average of five parallel samples. The degradation rate is calculated as follows:
$$\text{Degradation rate}\left(\text{\%}\right)=\frac{{W}_{0}-{W}_{f\,d}}{{W}_{0}}.$$
(10)
As previously mentioned, in the manufacturing process of drainage stents, cysteine soaking surface treatment is employed, along with the introduction of photoinitiators. Therefore, the precipitates that may be present in the drainage stent manufacturing process include amino acids, additive material molecules, residual monomers, and so on. In order to further determine the residue of harmful substances in the treated stent, the stent extract was extracted for infrared spectroscopy measurement (cm 6700, Thermo Nicolet), and the precipitate of the stent was analyzed by gas chromatography–spectrometry (AB Sciex 4800 plus). Infrared spectroscopy can provide information about compounds in a precipitated solution, and by comparing their spectra with known standards, it is possible to determine the compounds, functional groups, etc., that may be present in the solution, provide detailed information about the chemical changes during the degradation process of materials, and help to understand the degradation mechanism and product characteristics of materials. Mass spectrometry has a similar effect to infrared spectroscopy. Mass spectrometry can determine the molecular structure of degradation products, including their chemical formula and carbon backbone. After obtaining the mass spectrum of the stent precipitation solution, determine if there is any hazardous material residue in the scaffold by comparing the ion peaks on the sample mass spectrum to those on the 2959 initiator and cysteine standard mass spectra. Each centrifuge tube is equipped with a drainage stent, and a total of six groups are set up, with each group containing three samples (one to be tested and two backups). Add 4 ml of PBS (pH = 7.4) to each centrifuge tube, place them in a constant temperature shaking chamber (37 °C, 1000 rmp), and take the immersion solution for testing after 3 days.
Biocompatibility
Cytotoxicity assessment of the stents
HUVEC cells were cultured in leach liquor and subjected to three days of live/dead staining. Calcein-AM and PI stains (C326/P378, DOJINDO LABORATORIES) were employed for discriminating between viable and non-viable cells. Due to its lipophilicity, Calcein-AM can penetrate the cell membrane of viable cells. It is then cleaved by intracellular enzymes, resulting in the formation of Calcein, which becomes trapped within the cell membrane and emits green fluorescence at a wavelength of 490 nm. PI stains can permeate the membranes of non-viable cells, enter the nucleus, and intercalate with nuclear DNA, leading to the detection of red fluorescence at 488 nm or 545 nm [24]. HUVEC cells were seeded at a density of 3 × 10³ cells per well in 48-well plates following the standard cell culture protocol. The experimental group was treated with the medium containing the leach liquor, while the blank control group was treated with plain Dulbecco’s modified Eagle medium (DMEM (HyClone)) for comparison. Live/dead staining of cells was performed on days 1, 2, and 3 to determine fluorescence.
The specific steps are as follows:
(I.) Prepare the cell live/dead staining reagent by weighing 1 mg of PI and Calcein-AM. Dissolve them separately in 1 ml of deionized water and 1 ml of dimethyl sulfoxide [DMSO (Sigma-D2650)] to obtain a 1 mM Calcein-AM solution and a 1.5 mM PI solution. Store the solutions in a dark refrigerator at − 20 °C. (II.) Mix 4 μl of Calcein-AM solution and 6 μl of PI solution, and dissolve them in 2 ml of PBS solution to create the cell live/dead staining solvent. (III.) Using a pipette, aspirate the cell culture medium to be tested, wash the dish with PBS solution 3–5 times, add 200 μl of staining solvent per well, and incubate the dish for 30 min. (IV.) Remove the staining solvent from the medium, and capture images using an inverted fluorescence microscope in a light-free environment. Three random fields of view were examined per well.
Subcutaneous implantation experiments of SD rats
A total of twenty-one 6-week-old Sprague–Dawley (SD) rats were divided into four groups: three experimental groups (each with five rats) and one control group (with six rats). The SD rats were given an intramuscular injection of 0.4–0.6 ml (5 mg/kg) of xylazine hydrochloride and an injection of pentobarbital sodium (30 mg/kg) into the vein at the ear margin to induce combined anesthesia. The back hair of the rats was shaved, and a 2-cm incision was made using a scalpel. In the experimental group, drainage stents were implanted under the skin, while the control group did not receive any implantation after surgery. Tissue sections were observed at two weeks, four weeks, and three months post-surgery. The sections were stained with hematoxylin and eosin (HE), and the tissue inflammatory response was compared between the experimental group and the control group.
Animal surgery and stent implantation
Adult New Zealand white (NZW) rabbits were used as experimental animals and acclimated to the animal room environment for one week before the experiment [27]. The ambient temperature was controlled with a 12-h light/12-h dark cycle. During the acclimation period, the rabbits’ ears or other body parts were marked with markers or dyes, and they were divided into groups. This experiment was approved by the Laboratory Animal Ethics Committee of Zhongshan Ophthalmology Center, Sun Yat-sen University. To evaluate the system in vivo, drainage stents were implanted in the right eye of normal NZW rabbits with high IOP. Daily recordings of changes in intraocular pressure, follicular size, and vascular density grade were conducted to assess the functional and biological safety of the implanted drainage stents. Follow-up measurement of intraocular pressure and observation of follicle size and vascular density after surgery can provide an assessment of the outcome of the procedure and the condition of the eye after surgery. The filtration vesicle is a new aqueous humor drainage channel formed after stent implantation, and its size and shape directly affect the efficiency of aqueous humor drainage. Larger vesicles usually mean better aqueous humor drainage, which helps to reduce intraocular pressure. Vascular density reflects the blood supply to the tissues surrounding the vesicles, and higher vessel density usually means better tissue blood supply, contributing to the normal function and stability of the vesicles. According to the glaucoma filter vesicle IBAGS classification, the vascular density grade is divided into 0–4 grades. The higher the grade, the greater the vascular density. The size of the follicle is the diameter of the follicle (mm) * the height of the vertical cornea (mm) * the height from the sclera (mm).
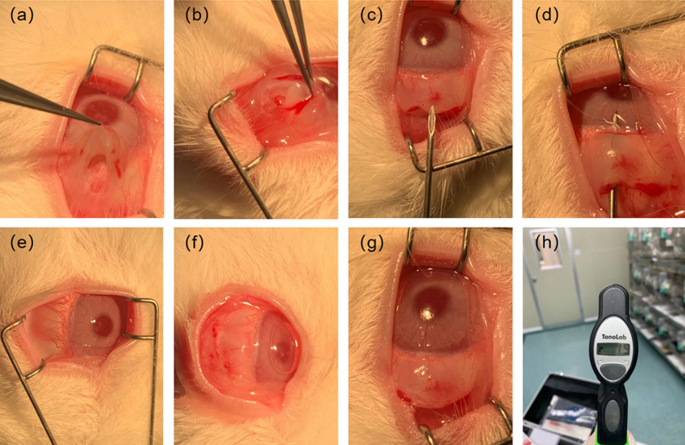
NZW rabbits were randomly divided into four groups (T1–T4), with one rabbit in each group, and housed individually. Groups T1–T3 underwent drainage stent implantation, while Group T4 served as the control group. The surgical procedure is shown in Fig. 11a–h (I.) The rabbits received intramuscular injections of 0.4–0.6 ml (5 mg/kg) of Xylazine Hydrochloride and pentobarbital sodium (30 mg/kg) was injected into the vein at the ear margin to induce combined anesthesia. Ocular local anesthesia was achieved using oxybuprocaine hydrochloride eye drops (s.a. ALCON-COUVREUR n.v.). (II.) The NZW rabbit was positioned on its left side to expose the right eye. The eyelashes of the New Zealand white rabbit were trimmed, and the area around the eyelids was disinfected with Aner iodine (Likang High-tech). The conjunctival sac was then soaked in povidone iodine for 1 min and rinsed multiple times with stroke-physiological saline solution (SPSS). (III.) Prior to surgery, the eyelid was opened using an eye speculum to expose the upper surgical conjunctival area. Local infiltration anesthesia was administered using lidocaine. A conjunctival flap was created along the limbus, and the conjunctiva and subconjunctival tissue were dissected bluntly along the scleral plane until reaching the limbus. (IV.) A needle was used to create a corneal scleral tunnel 2 mm behind the corneoscleral limbus. Subsequently, a drainage stent was implanted along the tunnel, and the conjunctival injection incision was continuously sutured using nylon thread. After the procedure, erythromycin eye ointment (Cisen pharma) was applied to the incision to prevent infection. The eye speculum was removed, and the rabbit was assisted in closing its eyelids. Once it recovered, it was returned to its cage.
The surgical procedure was performed by the same experienced surgeon. Postoperative care involved administering daily drops of Tobramycin and Dexamethasone Eye Drops. Daily recordings of changes in intraocular pressure, follicular size, and vascular density grade were conducted to assess the functional and biological safety of the implanted drainage stents. Follow-up measurement of intraocular pressure and observation of follicle size and vascular density after surgery can provide an assessment of the outcome of the procedure and the condition of the eye after surgery. The filtration vesicle is a new aqueous humor drainage channel formed after stent implantation, and its size and shape directly affect the efficiency of aqueous humor drainage. Larger vesicles usually mean better aqueous humor drainage, which helps to reduce intraocular pressure. Vascular density reflects the blood supply to the tissues surrounding the vesicles, and higher vessel density usually means better tissue blood supply, contributing to the normal function and stability of the vesicles. According to the glaucoma filter vesicle IBAGS classification, the vascular density grade is divided into 0–4 grades. The higher the grade, the greater the vascular density. The size of the follicle is the diameter of the follicle (mm) * the height of the vertical cornea (mm) * the height from the sclera (mm).
Statistical analyses
Statistical analyses were performed using SPSSAU. The data were presented as the mean ± standard deviation (SD) and were analyzed using RM ANOVA and one-way ANOVA. A p value < 0.05 was used as a criterion for statistical significance.


Add Comment